Amplex’s new (as of April 1st 2020) webmail interface is provided by MagicMail. This new webmail features significant upgrades over the previous roundcube e-mail interface including:
- Responsive Searching
- Spam Settings (Allow/Whitelist) (Deny/Blacklist)
- Server Side Delivery Filters
- Vacation / Auto Responder Messages
- User Managed E-mail Forwarding
- Enhanced Security Options
Login
To login to the new webmail visit https://webmail.amplex.net. Your login name is your full e-mail address and your password is your current e-mail password.
Once you login you will see your folders, messages, and a selection of buttons which enable you to do common tasks such as Compose a new message, Reply, Forward, and Delete. The More options menu allows you to print, download, open in a new window, and other options.

Responsive Searching
The responsive searching feature can be accessed via the main webmail interface located in the upper right corner labeled Search. Type in the search term you are looking for and press enter. The search results will appear in the main window. To return to seeing all of your messages press the Clear button next to search.

Spam Settings
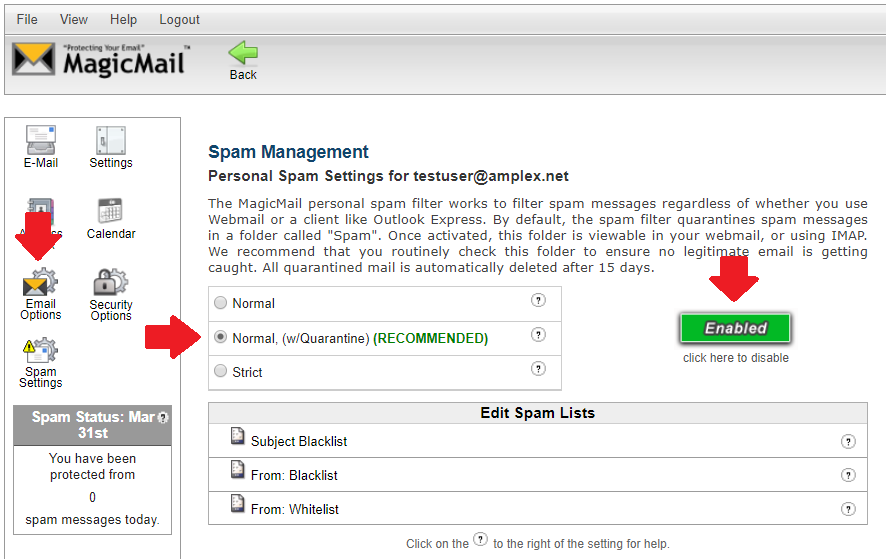
To access the spam settings from the main screen click Spam Settings. By default spam management is enabled with Quarantine. The spam scan settings have three basic settings, Normal (no quarantine for questions e-mails), Normal (w/Quarentine) which is the default option, and Strict. You can click the ? next to each setting for a more detailed explanation of the settings functions.
You can also disable spam scanning entirely by clicking the Enabled button. You
Whitelist / Allow / Bypassing Spam Control
If you have messages which are being incorrectly flagged as spam an effective way to resolve this is to add the sender to your From: Whitelist. To access the From: Whitelist from the main screen click Spam Settings then click From: Whitelist. A window will open asking you type senders e-mail address (the e-mail of the person sending your messages) and click Add. You can also see your current list of approved Senders and modify them from this interface.
You may also add an entire domain to the whitelist. For example if e-mails from abcdcompany.com are being regularly blocked you could add @abcdcompany.com to the whitelist allowing all e-mail from abcdcompany.com addresses.

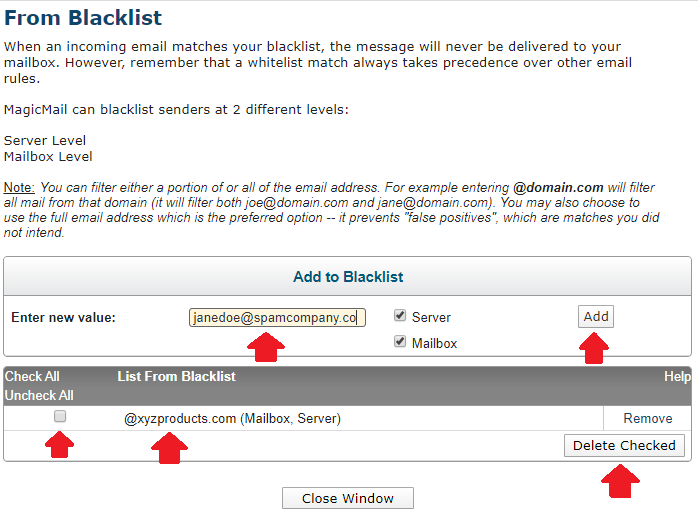
Blacklist / Deny / Forcing E-mail to Spam
A blacklist can be used to force a users e-mail to spam control. This can be done via the subject line or more popularly From e-mail address. It is important to note that spammers are very creative and will frequently change e-mail addresses and subject lines to bypass this type of manual spam control. This type of manual spam control is best used for messages you consider spam but might otherwise not be considered so by other users such as mass marketing e-mails or mailing lists.
To access the From: Blacklist from the main screen click Spam Settings then click From: Blacklist. A window will open asking you type senders e-mail address (the e-mail of the person s
You may also add an entire domain to the blacklist. BE VERY CAREFUL as this will block ALL e-mails from that domain. For example if e-mails from xyzproducts.com are all spam you could add @xyzproducts.com to the blacklist blocking all e-mail from xyzproducts.com addresses.
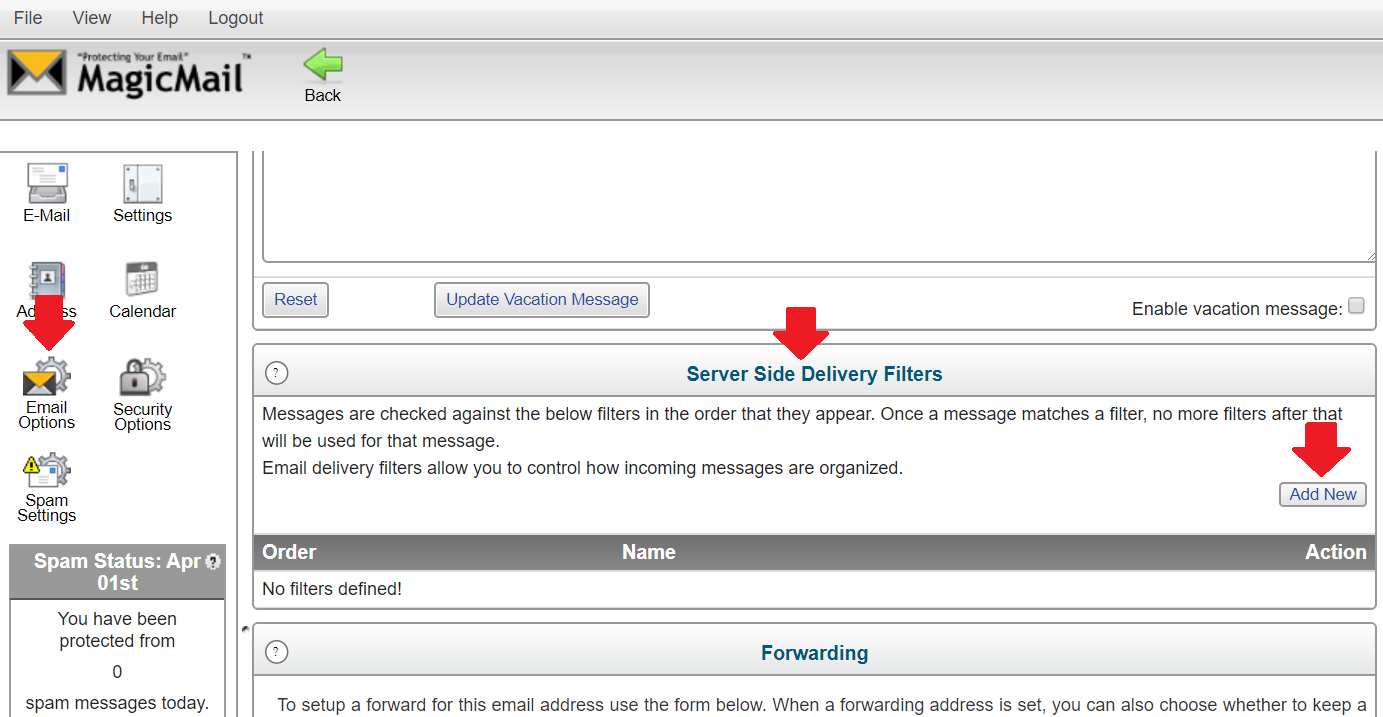
Server Side Delivery Filters
Server side delivery filters allow you to filter messages automatically into specific folders in your mail system. From the main screen click Email Options then scroll down to Server Side Delivery Filters and click Add New
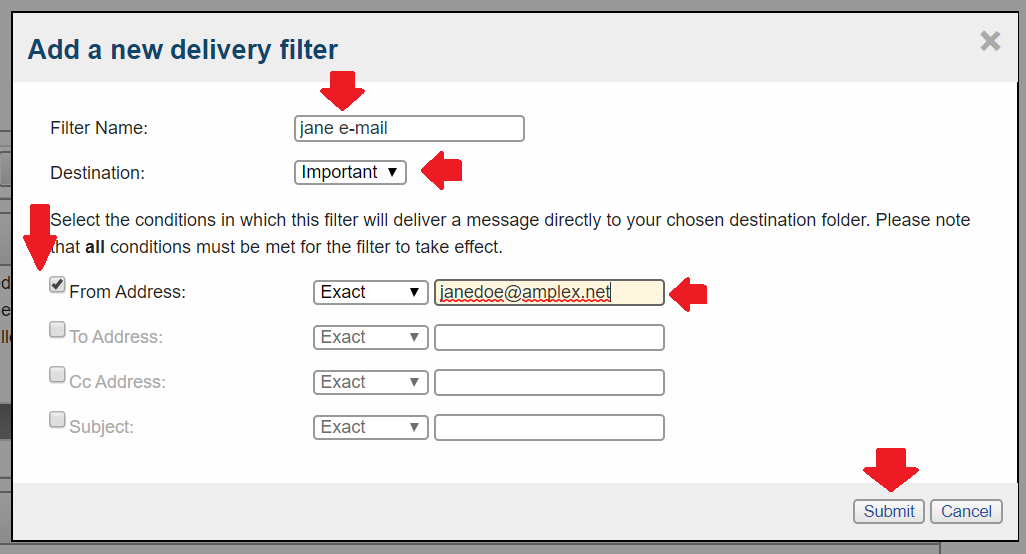
In the window that opens type a name for your filter in Filter name box. In destination choose where you want the messages moved to. From the below options (From Address / To Address / CC Address / Subject) choose the option which best fits your unique way of matching those messages then type in the pattern. A popular method might be to filter e-mails from a specific person to a folder named important (as shown below). Click Submit when done.
You can manage your existing filters (Edit/Delete) by visiting the main screen, clicking Email Options, then scrolling down to Server Side Delivery Filters and your current filters will be shown.
Vacation / Auto Responder Messages
To setup a vacation away message or auto responder from the main screen click Email Options. You will now see Vacation Message / Auto Responder. Click in the boxes for Vacation message starts and ends to see a see a calendar to choose start and end dates. Next type the subject for the auto-responder message in the Subject as it will appear on reply e-mail box. Click in the Vacation Message Text box and type the the text you wish to send as an automatic reply during your vacation. Check the Enable Vacation Message and click Update Vacation message to save the new settings.
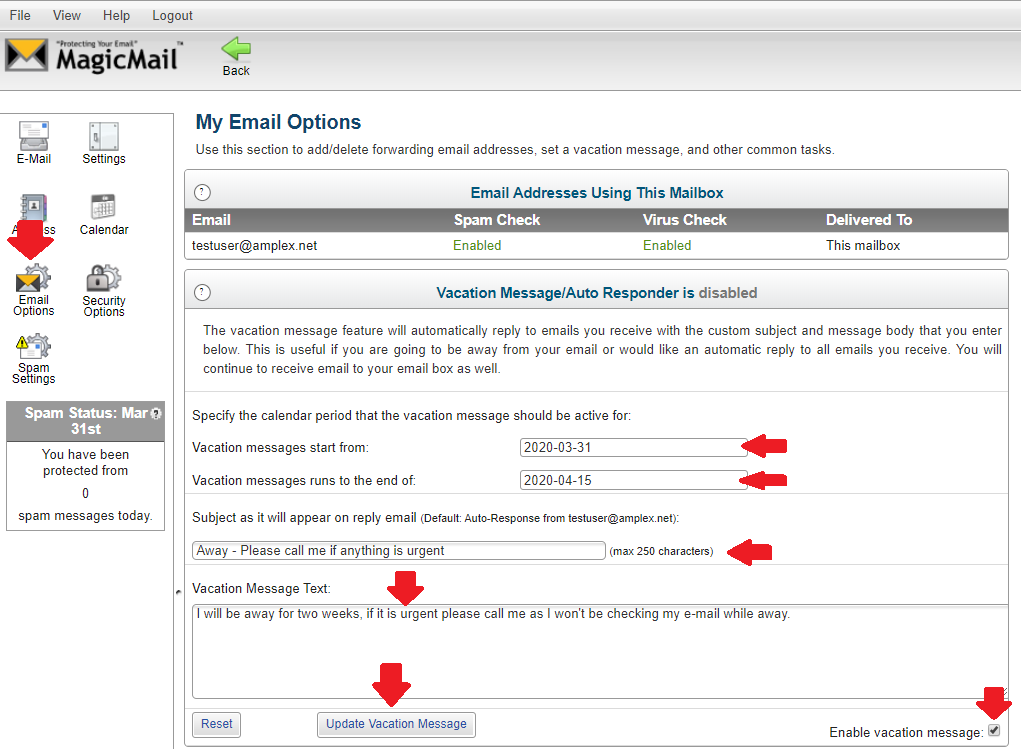
To disable the vacation responder simply revisit the Email Options and uncheck Enable Vacation message and click Update Vacation message.
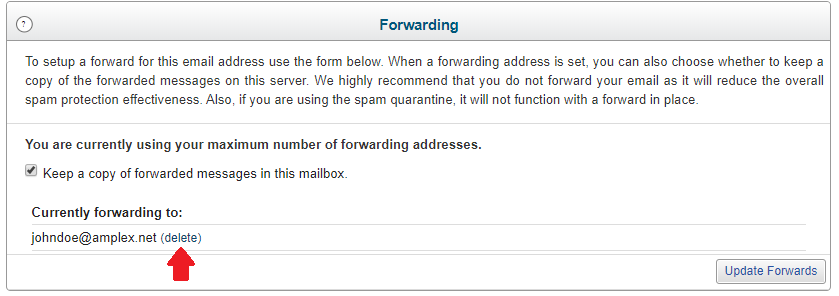
User Managed E-mail Forwarding
To forward all of your messages to another person from the main screen click Email Options. Scroll to the bottom of the page to Forwarding. You will see a box to type in the e-mail address you wish to forward messages to. You can check Keep a copy of forwarded messages in this mailbox option or leave it unchecked to simply forward the message which removes it from your e-mail box automatically. Click Update Forwards to save.
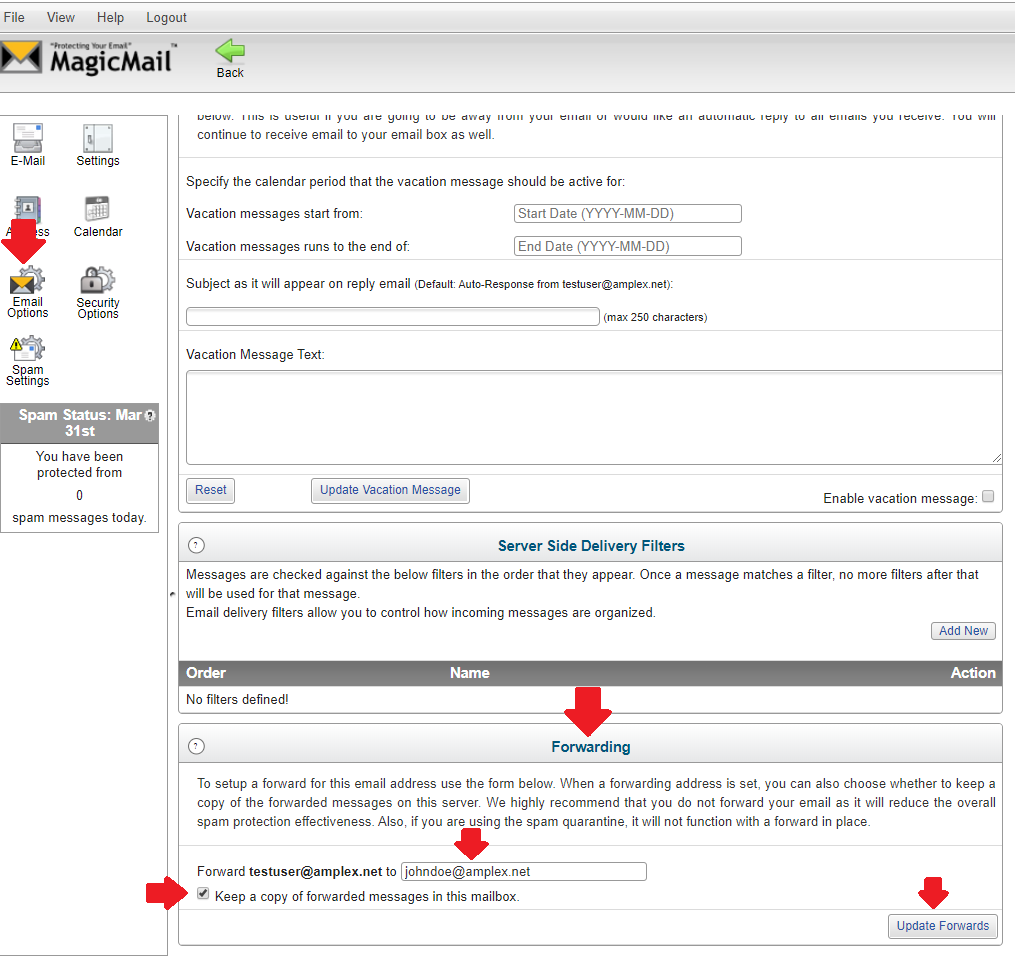
To remove forwarding revisit the Email Options Menu and click Delete next to the address you are currently forwarding e-mails to.
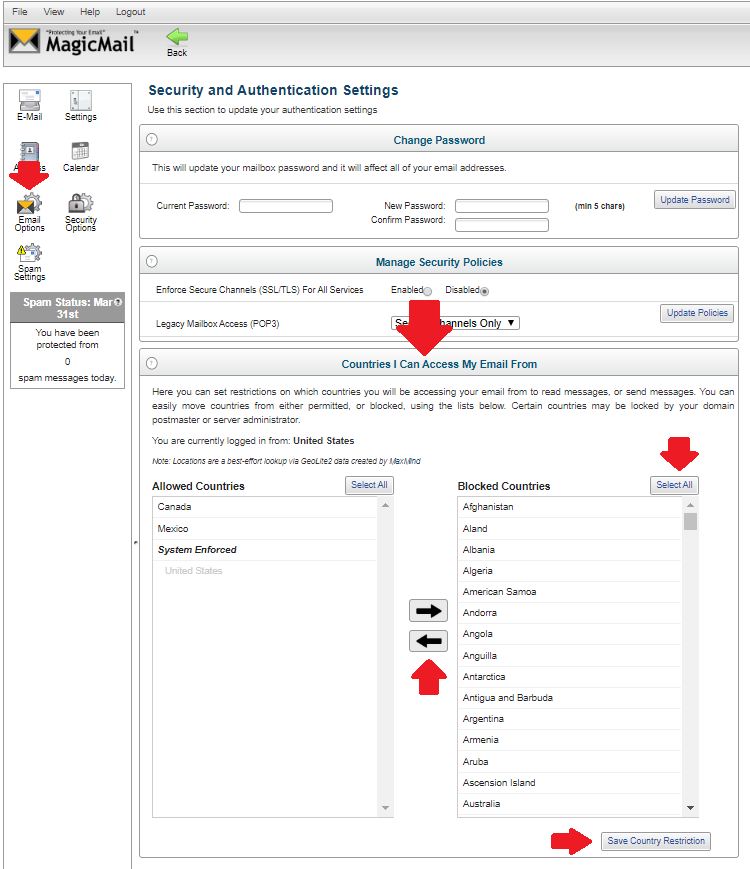
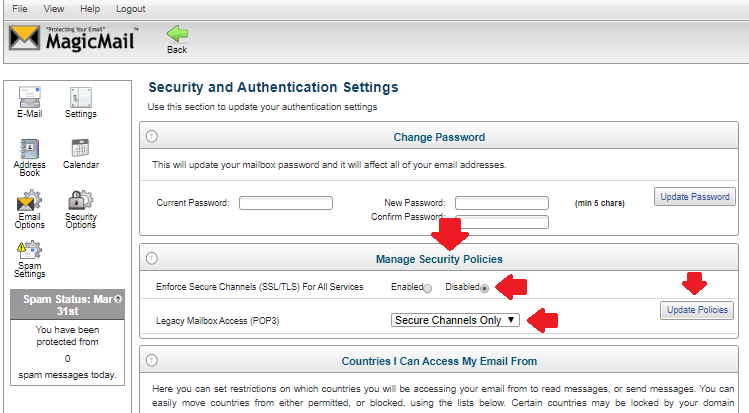
Enhanced Security Options
The enhanced security options include being able to change your own password, blocking access to your e-mail from foreign countries (enabled by default) and enforcing SSL/TLS encryption for all your clients (disabled by default). These security options can be customized per user based on your own balance of easy of use versus security. Some older e-mail clients may require you to disable some of these security features and as such should be upgraded to newer e-mail clients.
To change your own password from the main menu click on Security Options then in the Current password box type your current password. In the new Password and Confirm Password type your new password. Click Update Password to save.

To enforce strict security (e-mail clients must use SSL/TLS) from the main menu click on Security Options. Scroll to Manage Security Policues and click Enable next to Enforce Secure Channels (SSL/TLS) for all services and click Update policies. You can also disable POP3 security here if needed for a legacy client but is not recommended.
To modify the list of countries you can access your e-mail from, begin on the main menu then click on Security Options. Scroll down to Countries I can Access My E-mail From. You will see the default Canada, Mexico and United States Enabled. To add countries scroll on the list on the right, choose a country, then press the arrow key to the left. To add all countries (remove all restrictions) click Select all then click the arrow key to the left. Click Save Country Restriction once you’re done to save.